Today I finished my first cubist drawing, and started off with the second drawing, I wanted to have something about my culture or religion, so I chose the Om symbol and Ganesh, one of the gods from India.
The first cubist drawing I think was okay, but I think I will do it better with my next drawing, even though I only have a double-lesson left for my next one. I have already started to draw it on a piece of paper. I just need to finish that, then trace it onto grey paper, and then shade it. Hopefully I will be able to do all this next time, if I work really hard!
As soon as Mr Roman puts out the picture of my finished work, I will display it here. :-)
Friday 25 November 2011
Tuesday 15 November 2011
Before & After pictures
 This is my picture before & after the lesson
I regret using yellow on the stripes, so i am going to try to take it away, but other than that I am happy!
Thursday 10 November 2011
My Cubist Drawing
Last time, we drew another drawing using the same display, the guitar, flowers, etc. I think this was the most successful drawing so I chose it for my asssignment. After choosing the most successful drawing, we all had to draw the same drawing on a thicker, darker piece of paper, my placing the white paper on the thick paper, and draw the same contours again.
That is how far I have come right now.
Later today I will be writing about what I did in today's lesson, and the drawings before and after the lesson, as I don't have the picture right now.
- Anisha
That is how far I have come right now.
Later today I will be writing about what I did in today's lesson, and the drawings before and after the lesson, as I don't have the picture right now.
- Anisha
Tuesday 1 November 2011
Cubist Still Life by Roy Lichtenstein
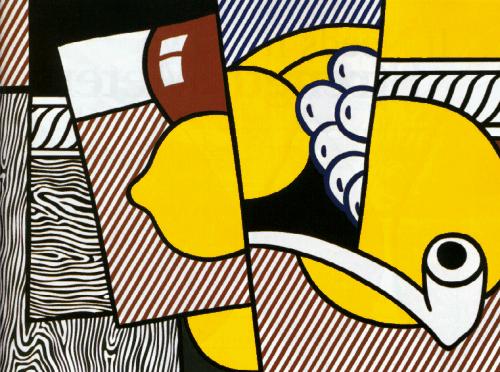
I have chosen to discuss the cubist drawing 'Cubist Still Life' by Roy Lichtenstein.
This Cubist Painting was made in 1974, and was one of Roy Lichtenstein's many cubist paintings.I like it because we are able to imagine what it shows, and because it is a very simple cubist painting, very like the ones we are going to make for the assignment. I think it shows parts of a table, some white grapes, a brown pot?, a smoking pipe.
It is made form manyview points, and is very similar to what we have done in the lesson, like when we split the page into different parts and started to draw from different angles. What I can learn from this picture when doing my own cubist painting, is the use of colour and stripes. The artist has used colours that stand out and used stripes which help the pcture become successful. I of course do not have to do that, but it is and idea.
I also like the way the artist has made the objects in the picture so big, and split it into different parts, which is something I can do in my own drawing.
Unit 2 - Cubism
 We have started a new unit called cubism.
Cubism is all about different view points, aspects and angles.
Today we first started off with drawing a guitar, a box, a flowerpot with 2 roses, and some more which was displayed in front of the classroom.
We had to draw the same display in a different viewpoint or angle on the same sheet of paper, making the drawing look abstract. To help us, we made two or three lines all across the sheet of paper and drew only some parts of the diplay in our area, and the other part with a different angle on the next area etc.
I think it was a little difficult, but with pr:actice makes perfect.
This is my drawing of today's lesson:

- Anisha
Subscribe to:
Posts (Atom)